When I started this project, I hadn't considered taking photos of it, but quickly I realized that others might want to know how to do this because it's a lot of fun and a wonderful visual representation of our year. I had seen a simple wheel that someone did, that was just flat paper pinned to the wall and I wondered..... How can I make this thing spin for real? So I devised a way to create an actual spinning wheel that we could turn throughout the year to show exactly where we were in reference to the seasons and sabbats.
Here's what you'll need:
Large pieces of cardboard
Scissors
Poster board (white, or whatever you like)
Wire
Wire pliers
Glue
3 plastic pony beads
Decorative paper/markers/stickers
and whatever else you want to decorate it with.
What I did was cut our patterned paper for my letters, lines, etc. But if you fancy yourself an artist you may draw or color it however you like. It's yours and you will have to look at it for however long you leave it on your wall.
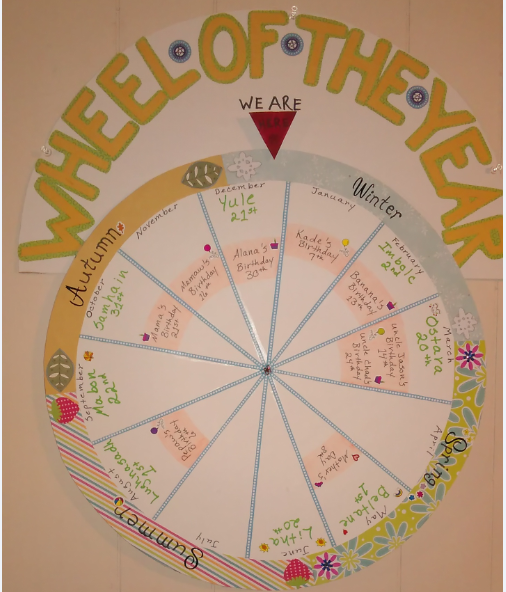
1. Make your Circle that will become the wheel:
Measure and cut a circle from a piece of cardboard. Make it as big or as small as you like. What I did was glue white poster board to the cardboard so that I could draw and write on it. Measure and make a small hole in the very center of the circle. This hole will be used later to suspend the wheel, and is also helpful when drawing the spokes of your wheel.
2. Create a base/back board:

The size of your back board will depend on how big you want your wheel to be. Notice the small hole in the center of the bottom piece. First, the round, top part of the back board is where your "title" will appear if you choose to have one ("wheel of the year"). The hole is where the wire will go so it must match up to the hole on your wheel and leave enough room for your words on the back board. I placed my wheel on top of the back board and measured how much room I wanted for the words on the back board and also for the pointer which indicates "we are here". Measure, and make your hole. You might notice that my back board is two pieces. I don't know if it's absolutely necessary, but as I was experimenting I wasn't really sure how I was going to do it... so it just happened.
3. Decorate your back board:

Again, I glued white poster board to the back board for a nice, clean surface to decorate. I cut my letters from patterned paper I got at walmart such as this:

NOTE: Don't glue or otherwise attach the pointer (red triangle) at this time. I found that it was best to wait until after the wheel is attached because the pointer will be on top of it and you'll need to leave sufficient space to keep it from rubbing the wheel too much.
Once you've cut out your letters or whatever you are going to put on the back board, place the wheel on the back board, line up the holes and draw a light mark to show how much of the board the wheel covers so you know what part of your decorations will show, or exactly what area to decorate. Then Decorate AWAY!
4. Decorate your Wheel!

With light pencil marks I outlined my wheel, the spokes, months, and outer edges that I used to mark the seasons. Then it was time to add some color and decorations. I used a lot of patterned paper for this. I first covered the "seasons" areas with patterned/colored paper:

I cut out leaves, snowflakes, and other images we associate with each season and glued them on, then put letter stickers on, but I didn't have enough for every word so I wrote the rest. After I was satisfied with the seasons sections I cut out some lines for my spokes and glued them on, and wrote the months, sabbats, and other special days on the calendar section.

5. Attach Wheel to Back Board:
I used copper wire because that's what I had though you can use whatever wire you want as long as it is fairly firm and will keep it's shape. I used 4 pieces and twisted them together. Open up one end to make an x which will keep the wire in place on the back of the back board. Thread it through the back board:
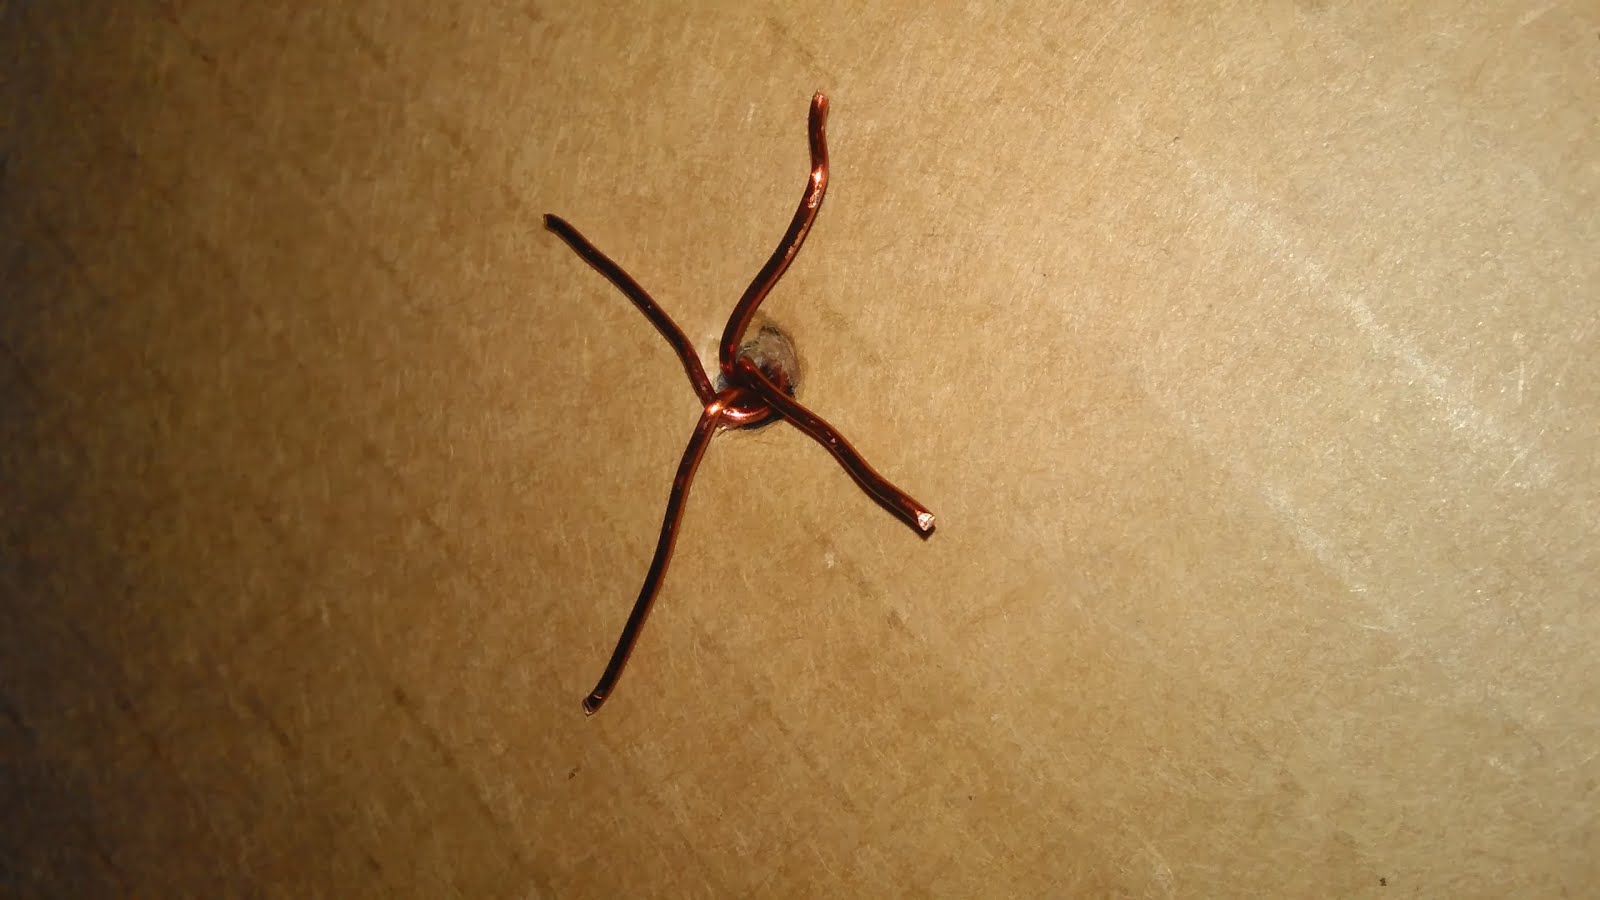
Then I covered it with a circle of white poster board and glued it down really good so it wouldn't spin. And I mean I put glue all under and on top of the wire, then glued the poster board. I really wanted it to stay. hahaha

I also cut out an even larger circle and glued on top of the first circle.. just because I wanted it to never come apart.
Flip the board over and put one plastic pony bead onto the wire. Cut off the excess wire and leave about an inch.

Thread the wire through your wheel:

You might choose to put something there for the center of your wheel. It could be anything such as pretty beads, a nice stone, or whatever. Of course, I didn't think of that until I cut and curled my wire so it's too late for me, but you've got options. I snipped a bit of the wire off and curled them under. I did notice that since my lines were glued pieces of paper the wire was catching when it spun, so I went back and curled the ends outward. Now it spins just fine.

6. Attach Pointer

I cut out a triangle, covered it with white poster board, colored it red and wrote "Here" on it. Then I mapped out where I wanted it. I wanted it to be in front of the wheel but not too far down. I glued 2 pony beads together and then to the back board. This allows for enough space since one is used between the wheel and back board. Consider the thickness of the cardboard you've used as well as the bead separating it from the backboard when deciding how far out your pointer should be.
After the beads were dry and well in place I glued the pointer on top of them. Simple enough I suppose.

7. Hanging your Wheel:
It's really up to you to decide how you'd like to hang your wheel. There are many way to hang things. You could attach a string to the back like some old fashioned frames, use brackets assuming you are able to attach them to cardboard, or do like me and just use thumb tacks. By the end of this thing I was like.. "I think I've done enough. I'm just gonna shove some tacks in there!" hahaha
Either way, you'll have something great to share with your kids to show them where we are in the year, what season we are in, how close special days are... It's just great! I did later go back and put more stickers on it, and will probably continue to do so as this year progresses and certain themes become available in stores such as Ostara eggs and things of that nature. This is also something you can do with your kids as a fun project.
I really hope you enjoyed this post and I'd love to see what you come up with if you decide to do this!
Thanks for reading! And may the Gods Bless you and your families!